
Enabling and establishing a stable remote network connection between Windows 11 computers requires preparation and a specific version of the operating system.
If you work from home or on the go, it can be extremely convenient to create a stable remote network connection between different PCs using software and protocols built into Windows 11. By combining the Remote Desktop connection application with a VPN connection, you can directly access supported internal computer systems. From a productivity perspective, you basically work in the office without physically being in the office.
SEE: Google Workspace vs Microsoft 365: A side-by-side analysis (TechRepublic Premium)
However, enabling and establishing this stable remote network connection requires preparation and a specific version of Windows 11. Remote Desktop Connection remains similar to the version found in Windows 10, but there are minor differences that you should be aware of during the activation procedure. Additionally, you may need help from your IT department to complete the sign-in process.
Windows 11 Pro: Enable the Remote Desktop Connection app
The Remote Desktop Connection application is only available for users of Windows 11 Pro or Windows 11 Enterprise, as Windows 11 or 10 Home users are specifically excluded from this feature by Microsoft.
In order to enable remote connections, users will need to upgrade to the Pro or Enterprise version of the Windows operating system. It’s not practical, but it may be worth the extra cost.
To upgrade Windows 11 Home to Windows 11 Pro, open Settings and go to System | About | Product key and activation to access the screen shown in Figure A.
Figure A
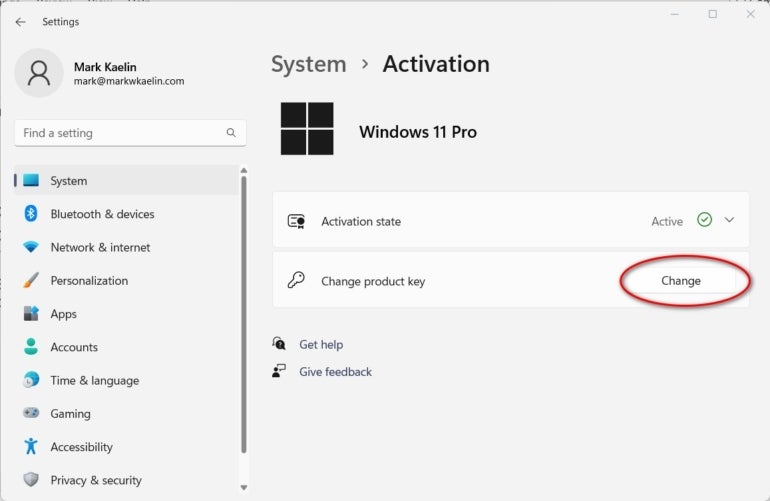
Windows Home users can purchase and enter a new product key that upgrades their operating system to a Pro version. If you have an old Pro product key from a previous version of Windows Pro (10, 8, or 7), Microsoft may allow you to upgrade at no additional cost.
With Windows 11 Pro in place, you can now enable remote connection protocols. Open Settings again and scroll down the list of items to find Remote Desktop and click on it to open the details page (Figure B).
Figure B
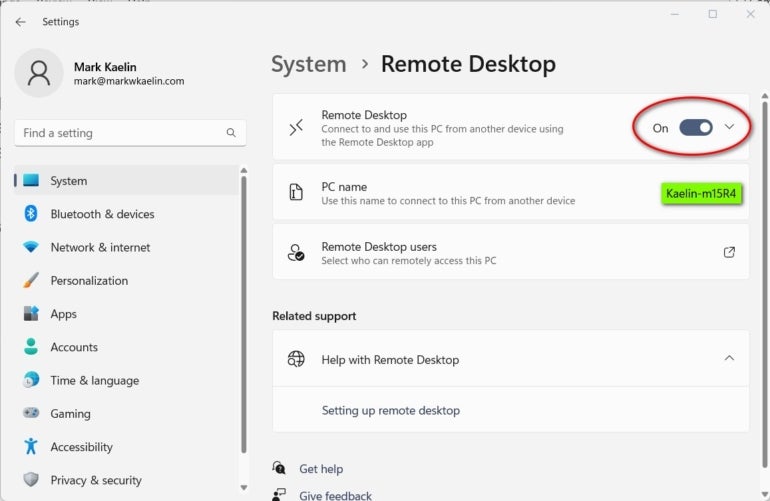
Flip the toggle switch to the On position and confirm your request. Note the computer name. To use the Remote Desktop Connection application, you need to know the exact name of each computer before you can connect to it remotely. For computers managed by your IT department, you may also need to request a specific path and name to establish your remote connection. For your home network, just the name should suffice.
When you want to establish a remote connection to this computer, start the Remote Desktop Connection application on a secondary PC (Figure C). The easiest way to do this is to type “remote” into desktop search and choose the appropriate item from the results.
Figure C
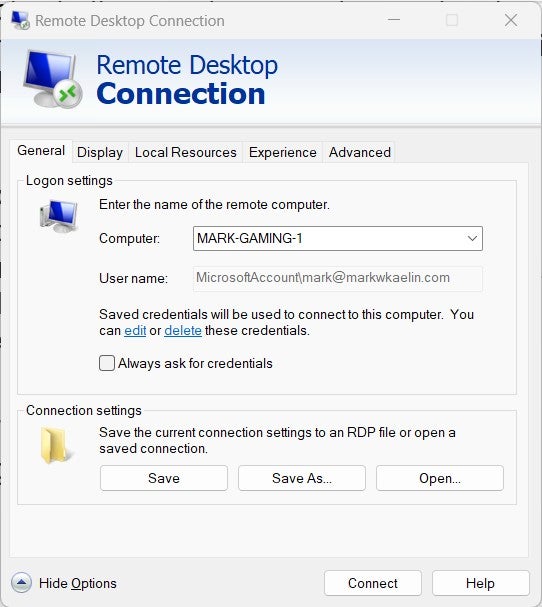
You will probably need to enter the correct credentials and provide the correct computer name the first time you try to establish a remote connection. After that, assuming everything goes as planned and you choose the right configuration, you just need to click on the Connect button.
TechRepublic posted a tutorial explaining all the potential options of the Remote Desktop Connection application if you want to explore the details of this useful feature of Windows 11 Pro.
Work without being in the office
At a time when office presence has been reduced for so many industries and businesses, the ability to use a stable and reliable remote connection is of paramount importance.
Upgrading to Windows 11 Pro, while inconvenient and a bit frustrating, may be worth the extra cost. If you want to save money and still use Windows 11 Home, you can consider the benefits of the Chrome Remote Desktop app.